





Key Takeaways
- Arc supports Solidity and standard EVM workflows, allowing Ethereum developers to use familiar skills and deployment practices.
- Arc supports different deployment workflows: Arc Foundry, Standard Foundry, Hardhat and Circle Contracts.
- Arc uses USDC for gas, so deployment wallets need USDC instead of ETH to pay for transaction fees.
- Test Arc-specific behaviour on Arc Foundry and Arc Testnet before deploying contracts to mainnet.
- Mainnet transactions must be paid for in gas using real USDC and go through final testing, verification and security checks.
Deploying a Solidity smart contract on Arc follows the familiar EVM workflow used on Ethereum: write and compile the contract, configure the network, fund the deployer with USDC, and submit the deployment transaction.
Arc remains EVM-compatible, but its USDC-native gas model and Arc-specific execution behavior require a few additional checks. Developers should test these differences before moving a contract to mainnet. If you are new to Arc, first understand how Arc blockchain works to learn about its architecture and core features.
You can deploy on Arc with Arc Foundry, standard Foundry, Hardhat, or Circle Contracts. For most development workflows, start on Arc Testnet, validate the contract, verify the deployment, and only then move to mainnet with real USDC.
What You Need Before Deploying on Arc
A few basics must be in place before Arc smart contract development begins, so check each item below first.
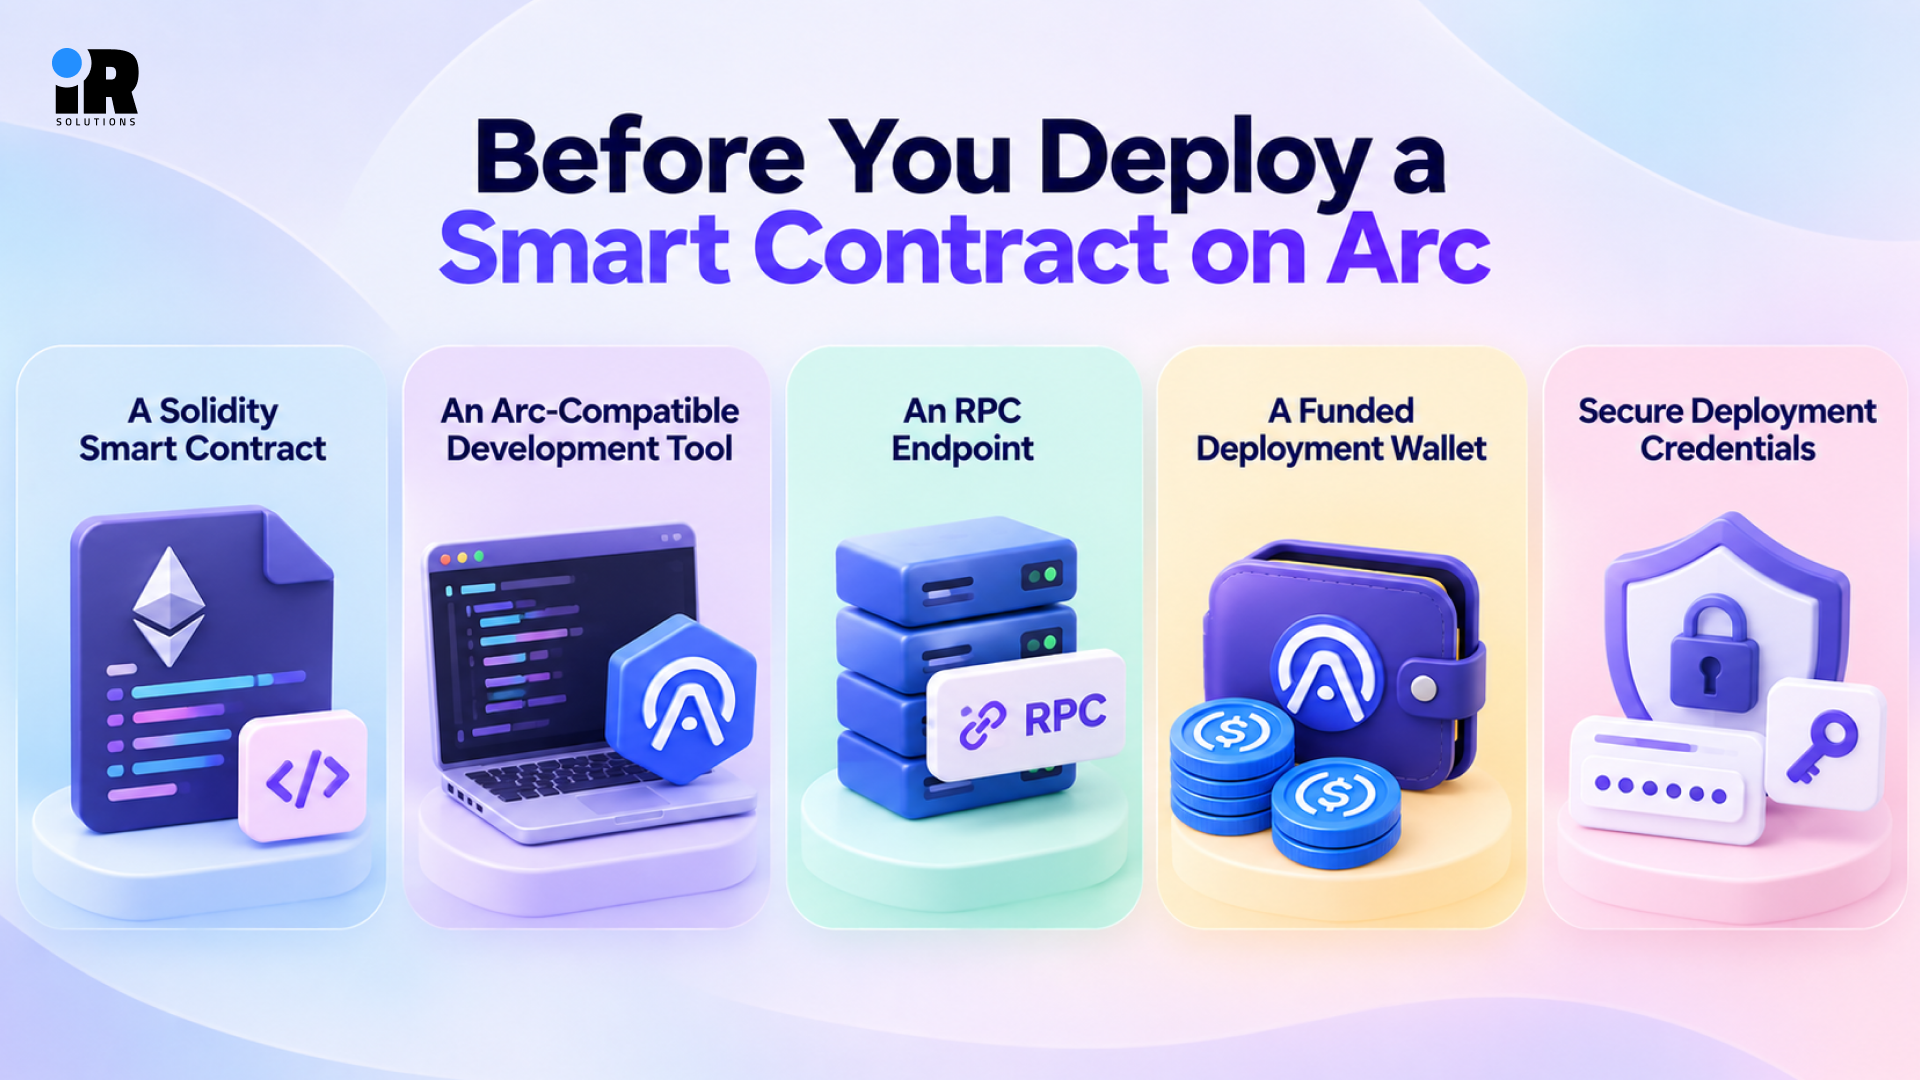
A Solidity Smart Contract
Arc is EVM compatible, so it supports normal Solidity contracts and ABI-based interaction without any special language changes. You can keep using familiar Ethereum tooling, and our guide on how smart contracts work covers the full lifecycle.
An Arc Compatible Development Tool
Arc Foundry and Hardhat provide the main developer-controlled deployment workflows, while Circle Contracts offers a managed alternative. Arc Foundry is especially useful because it reproduces Arc-specific execution rules during local testing and Arc Solidity development.
An RPC Endpoint
Your tools need an RPC endpoint to talk to the network, and the table below lists the current settings.
Setting | Arc Mainnet | Arc Testnet |
Chain ID | 5042 | 5042002 |
RPC | https://rpc.mainnet.arc.io | https://rpc.testnet.arc.io |
Explorer | https://arcscan.app | https://testnet.arcscan.app |
Gas currency | USDC | Testnet USDC |
A Funded Deployment Wallet
On testnet, you get free USDC from the faucet, while mainnet deployments require real USDC in your wallet. Arc's documentation confirms that USDC pays transaction fees. Arc uses USDC as its native gas token, so deployment transactions do not require ETH for gas.
Secure Deployment Credentials
Never paste private keys into source code, and never commit your .env file to any shared repository. Prefer an encrypted wallet keystore or a secrets manager, and always keep your production deployer separate from everyday wallets.
Choose Your Arc Deployment Method
Each method handles Arc blockchain smart contracts well, but the right choice depends on your team's language and needs.
Method | Best For | Main Advantage |
Arc Foundry | Solidity-first teams | Arc-specific local execution and testing |
Hardhat | TypeScript and JavaScript teams | Familiar plugin and deployment workflow |
Circle Contracts | Managed or template-based deployments | Less infrastructure and boilerplate |
The main tutorial uses Arc Foundry, followed by shorter walkthroughs for Hardhat and Circle Contracts at the end.
Step 1: Set Up Arc Foundry
Arc Foundry is a fork of Foundry with first-class Arc support, and it ships with three main tools.
- arc-forge: Handles building, testing, scripting and deployment for all your Solidity projects on Arc networks.
- arc-cast: Easily query Arc network data, by handling contract calls, transactions and RPC interaction.
- arc-anvil: It provides a local Arc execution environment for fast testing before you touch any live network.
Why Use Arc Foundry Instead of Standard Foundry?
Standard Foundry still works for normal EVM workflows, but Arc Foundry reproduces Arc precompiles, gas accounting, and revert behavior locally. It also supports Arc hardfork configuration, and our guide to smart contract development tools compares the wider tooling options.
Step 2: Create or Prepare the Solidity Contract
The mechanics of the deployment should be clear and focused, so in the tutorial, use a single simple example called HelloArc.sol. It has one state variable, one read function, one write function, and one event for simple tracking.
// SPDX-License-Identifier: MIT
pragma solidity ^0.8.24;
contract HelloArc {
string public message;
event MessageUpdated(address indexed sender, string newMessage);
constructor(string memory initialMessage) {
message = initialMessage;
}
function getMessage() external view returns (string memory) {
return message;
}
function setMessage(string calldata newMessage) external {
message = newMessage;
emit MessageUpdated(msg.sender, newMessage);
}
}
Your project keeps contracts in src, deployment scripts in script, and test files in the test folder. Once the contract is written, the next task is turning it into something the network can run.
Compile the Contract
Run the build command below to compile your Solidity code with Arc Foundry before testing or deploying anything.
arc-forge build
Compilation produces the contract bytecode, the ABI, and build artifacts that your later scripts and tools use during deployment.
Step 3: Test the Contract Before Deployment
Testing on Arc needs two layers, covering normal contract logic first and Arc-specific behavior second.
Run Normal Unit Tests
Start with unit tests that check basic logic, such as reading the message and updating it correctly.
arc-forge test
Our guide on smart contract testing covers fuzzing, invariant testing, integration testing, and coverage in much greater depth.
Run Arc-Specific Local Tests
Do not assume a normal Anvil environment is enough, because standard Anvil does not follow Arc execution rules.
arc-anvil
Arc Foundry can launch a local Arc chain with Arc execution semantics, which makes your local results far more reliable.
Test Arc-Specific Behaviors
Depending on your contract, test native USDC transfers, payable functions, ERC-20 USDC interactions, decimal conversions, blocklist behavior, and any logic that depends on timestamps or randomness. Arc's compatibility guidance also recommends testing Arc-specific execution behavior rather than relying only on standard EVM or Anvil tests.
Step 4: Configure Arc Testnet
Connect your project to Arc Testnet by storing the RPC URL, chain ID, and deployer account in environment variables.
ARC_TESTNET_RPC_URL=https://rpc.testnet.arc.io
ARC_CHAIN_ID=5042002
Arc's official testnet RPC is https://rpc.testnet.arc.io, and the matching Arc testnet chain ID is 5042002. A quick network check at this stage saves you from costly mistakes later in the process.
Confirm You Are on the Correct Network
Check the chain ID, latest block, and deployer balance, so you know the RPC connection works as expected.
arc-cast chain-id --rpc-url $ARC_TESTNET_RPC_URL
arc-cast block-number --rpc-url $ARC_TESTNET_RPC_URL
arc-cast balance <DEPLOYER_ADDRESS> --rpc-url $ARC_TESTNET_RPC_URL
This simple habit prevents accidental deployments to the wrong network and confirms your wallet is ready to go.
Step 5: Fund the Deployer With Testnet USDC
Arc also pays for gas using USDC, so your deployer needs some testnet USDC before it can send a transaction.
- Get Funds: Request testnet USDC from Circle’s faucet with the address of your deployment wallet on Arc Testnet.
- Check Balance: Check your wallet balance with arc-cast to make sure the faucet transfer actually landed safely.
- Enough Gas: Ensure the balance is sufficient for the deployment transaction, since larger contracts cost more gas to deploy.
Native and ERC-20 USDC Are One Balance
Arc represents native USDC in 18-decimal native units, while the ERC-20 USDC interface uses 6 decimals. The two representations refer to the same underlying USDC balance, but your contract and application code must convert between these units correctly. This matters once contracts send or receive USDC, and Arc's USDC native gas model explains the full design.
Step 6: Create the Deployment Script
The deployment script loads your contract, broadcasts the deployment transaction, and returns the new contract address.
// SPDX-License-Identifier: MIT
pragma solidity ^0.8.24;
import {Script, console} from "forge-std/Script.sol";
import {HelloArc} from "../src/HelloArc.sol";
contract DeployHelloArc is Script {
function run() external returns (HelloArc hello) {
vm.startBroadcast();
hello = new HelloArc("Hello, Arc!");
vm.stopBroadcast();
console.log("HelloArc deployed at:", address(hello));
}
}
Never place a real private key in this script, and always rely on a secure wallet or account handling instead.
Step 7: Deploy the Contract to Arc Testnet
This is the core step, where you run the Arc Foundry deployment command against the Arc testnet RPC.
arc-forge script script/DeployHelloArc.s.sol:DeployHelloArc \
--rpc-url $ARC_TESTNET_RPC_URL \
--account arc-deployer \
--broadcast
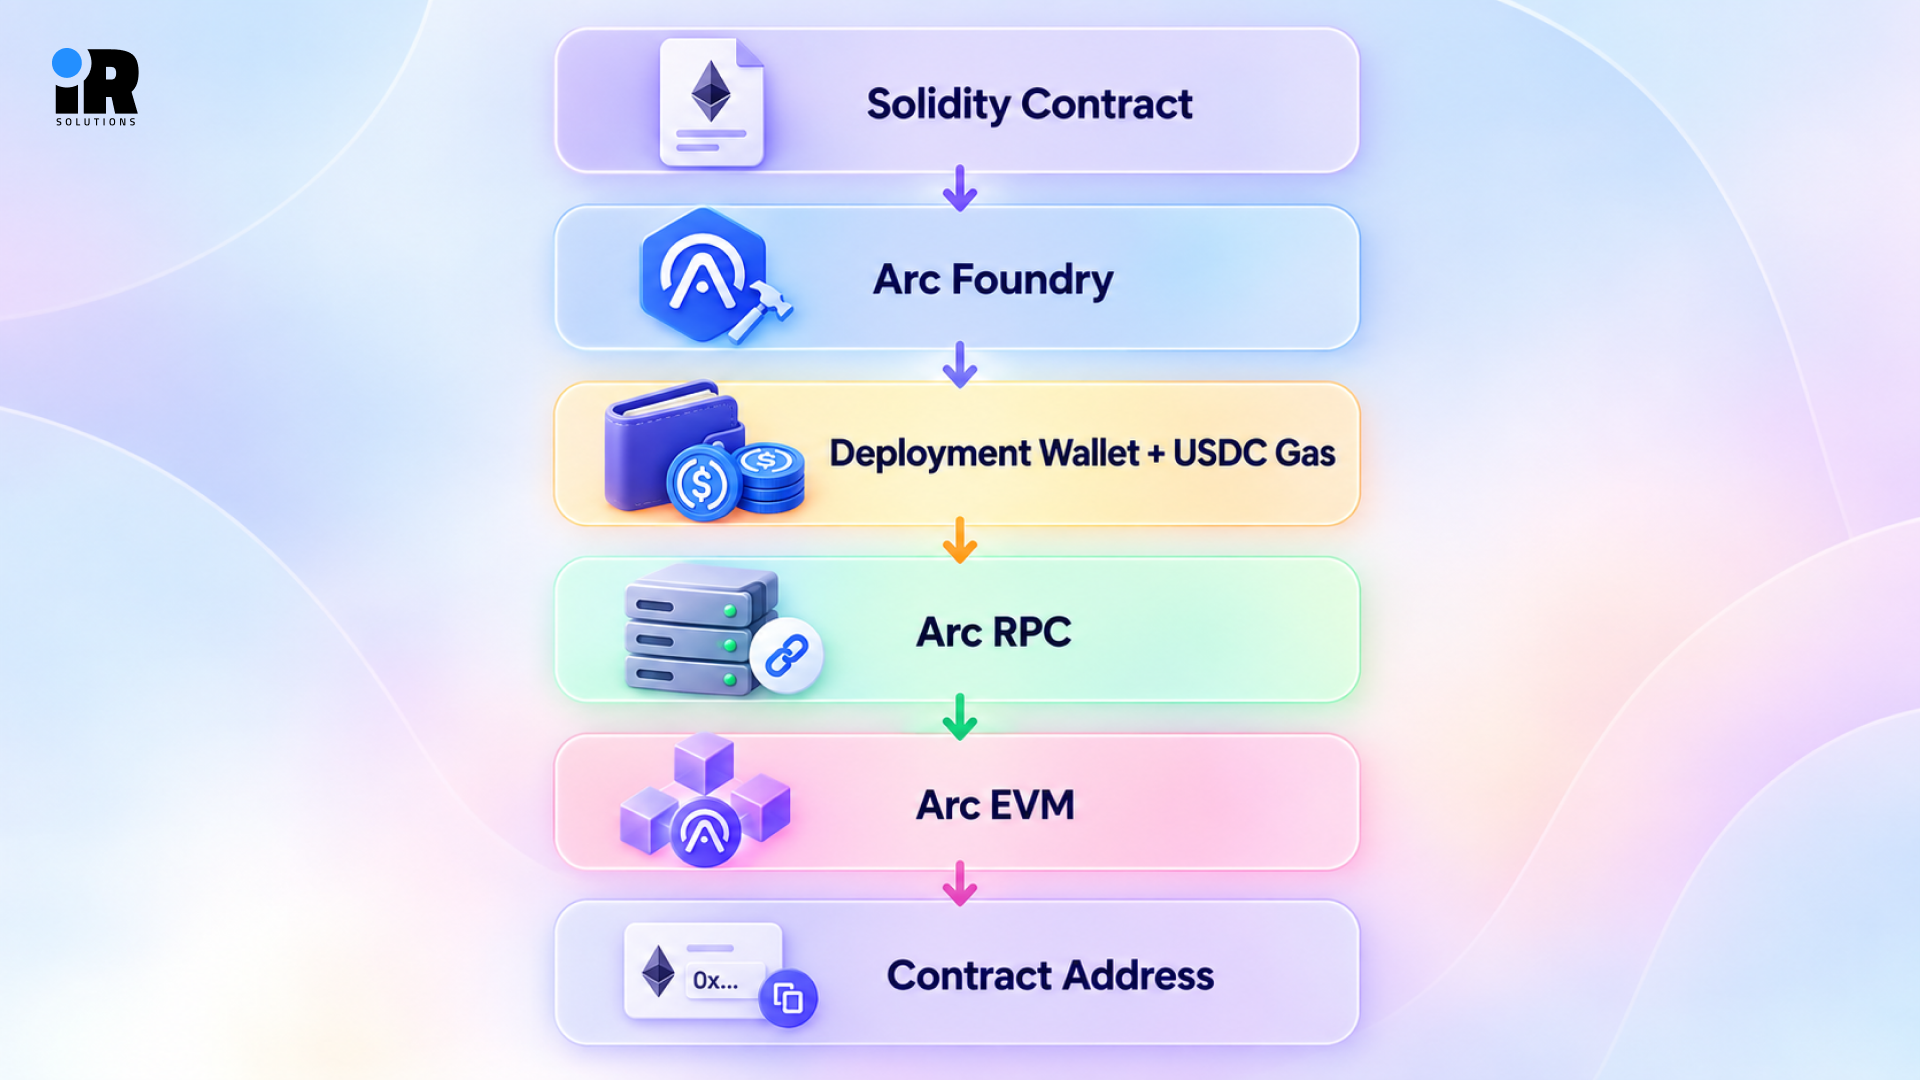
The tool compiles, simulates, signs, submits, and executes the transaction, then returns the hash and contract address. Arc uses deterministic finality, so a committed block means your deployment is final without Ethereum-style confirmation counts.
The flow below summarizes each stage of an Arc testnet smart contract deployment from source code to address.
Step 8: Confirm the Contract Was Deployed
A successful command is a good sign, but you should confirm the deployment in three separate ways.
Check the Transaction Receipt
Pull the receipt using the transaction hash and confirm the status, block number, gas used, and contract address.
arc-cast receipt <TX_HASH> --rpc-url $ARC_TESTNET_RPC_URL
A status value of 1 means the transaction succeeded and the contract now exists at that address.
Check the Contract Bytecode
Retrieving code from the deployed address confirms that real contract bytecode now lives at that location on chain.
arc-cast code <CONTRACT_ADDRESS> --rpc-url $ARC_TESTNET_RPC_URL
An empty result such as 0x means no contract exists there, so recheck the network and address.
Open the Contract in Arc Explorer
Open the relevant Arc Explorer with the deployed contract address and check the deployment transaction, deployment address, contract address, transaction fee and emitted events. For testnet deployments, use Arc Testnet explorer; for production deployments, use Arc Mainnet explorer.
Keep the deployment transaction hash and contract address with your project records. You will need both when verifying source code, updating your application or investigating later transactions.
Step 9: Verify the Smart Contract Source Code
Deployment confirmation confirms the contract exists, source verification confirms the code is what you actually pushed out. Arc’s Blockscout explorer supports verified source code. There are several clear benefits to your project with Arc contract verification.
- Transparency: Users can inspect the source code of the deployed bytecode.
- Debugging: Verified source makes contract functions and events easier to inspect through the explorer.
- Interaction: When verification is available, explorer interfaces can expose contract read and write functions.
- Review: Developers and security reviewers can inspect the published source, not just bytecode.
Step 10: Interact With the Deployed Contract
After deployment, a quick interaction test proves that your contract actually works on the live network.
arc-cast call <CONTRACT_ADDRESS> "getMessage()(string)" --rpc-url $ARC_TESTNET_RPC_URL
arc-cast send <CONTRACT_ADDRESS> "setMessage(string)" "Hello from Arc Testnet" \
--rpc-url $ARC_TESTNET_RPC_URL --account arc-deployer
Use arc-cast to call a read function, send a write transaction, and inspect the resulting transaction on chain. Finally, confirm the MessageUpdated event appears in the explorer, which shows your write function executed as intended.
Deploying to Arc With Hardhat
Arc's compatibility guidance confirms Hardhat still supports Arc deployment workflows because the network remains fully EVM compatible.
Add the Arc Network Configuration
Add Arc Testnet to your Hardhat config with the RPC URL, chain ID, and an account loaded from environment variables.
import { HardhatUserConfig } from "hardhat/config";
import "@nomicfoundation/hardhat-toolbox";
import "dotenv/config";
const config: HardhatUserConfig = {
solidity: "0.8.24",
networks: {
arcTestnet: {
url: process.env.ARC_TESTNET_RPC_URL || "https://rpc.testnet.arc.io",
chainId: 5042002,
accounts: process.env.DEPLOYER_KEY ? [process.env.DEPLOYER_KEY] : [],
},
},
};
export default config;
This keeps your private key out of source code while giving Hardhat everything it needs for Arc Hardhat deployment.
Compile the Contract
Place HelloArc.sol inside the contracts folder, then run the compile command to generate bytecode and ABI files.
npx hardhat compile
Hardhat stores the output in its artifacts folder, which the deployment script reads automatically during the next step.
Run the Deployment Script
Write a short script that deploys HelloArc with its constructor message, then run it against the Arc Testnet network.
import { ethers } from "hardhat";
async function main() {
const hello = await ethers.deployContract("HelloArc", ["Hello, Arc!"]);
await hello.waitForDeployment();
console.log("HelloArc deployed at:", await hello.getAddress());
}
main().catch((error) => {
console.error(error);
process.exitCode = 1;
});
npx hardhat run scripts/deploy.ts --network arcTestnet
The script waits for execution and prints the new contract address once the transaction lands in a block.
Confirm the Deployment
Search the printed address on the Arc testnet explorer and check the creation transaction, deployer, and contract code. The same receipt, bytecode, and explorer checks from the Foundry section apply here without any changes at all.
Deploying With Circle Contracts
Circle Contracts provides a managed workflow for deploying, interacting with, and monitoring smart contracts, including templates and custom contracts. Circle's current Arc workflow covers deployment, interaction, transaction tracking, and event monitoring through one managed platform. This approach is particularly relevant for teams already using Circle's developer infrastructure or deploying contracts through a backend-controlled workflow.
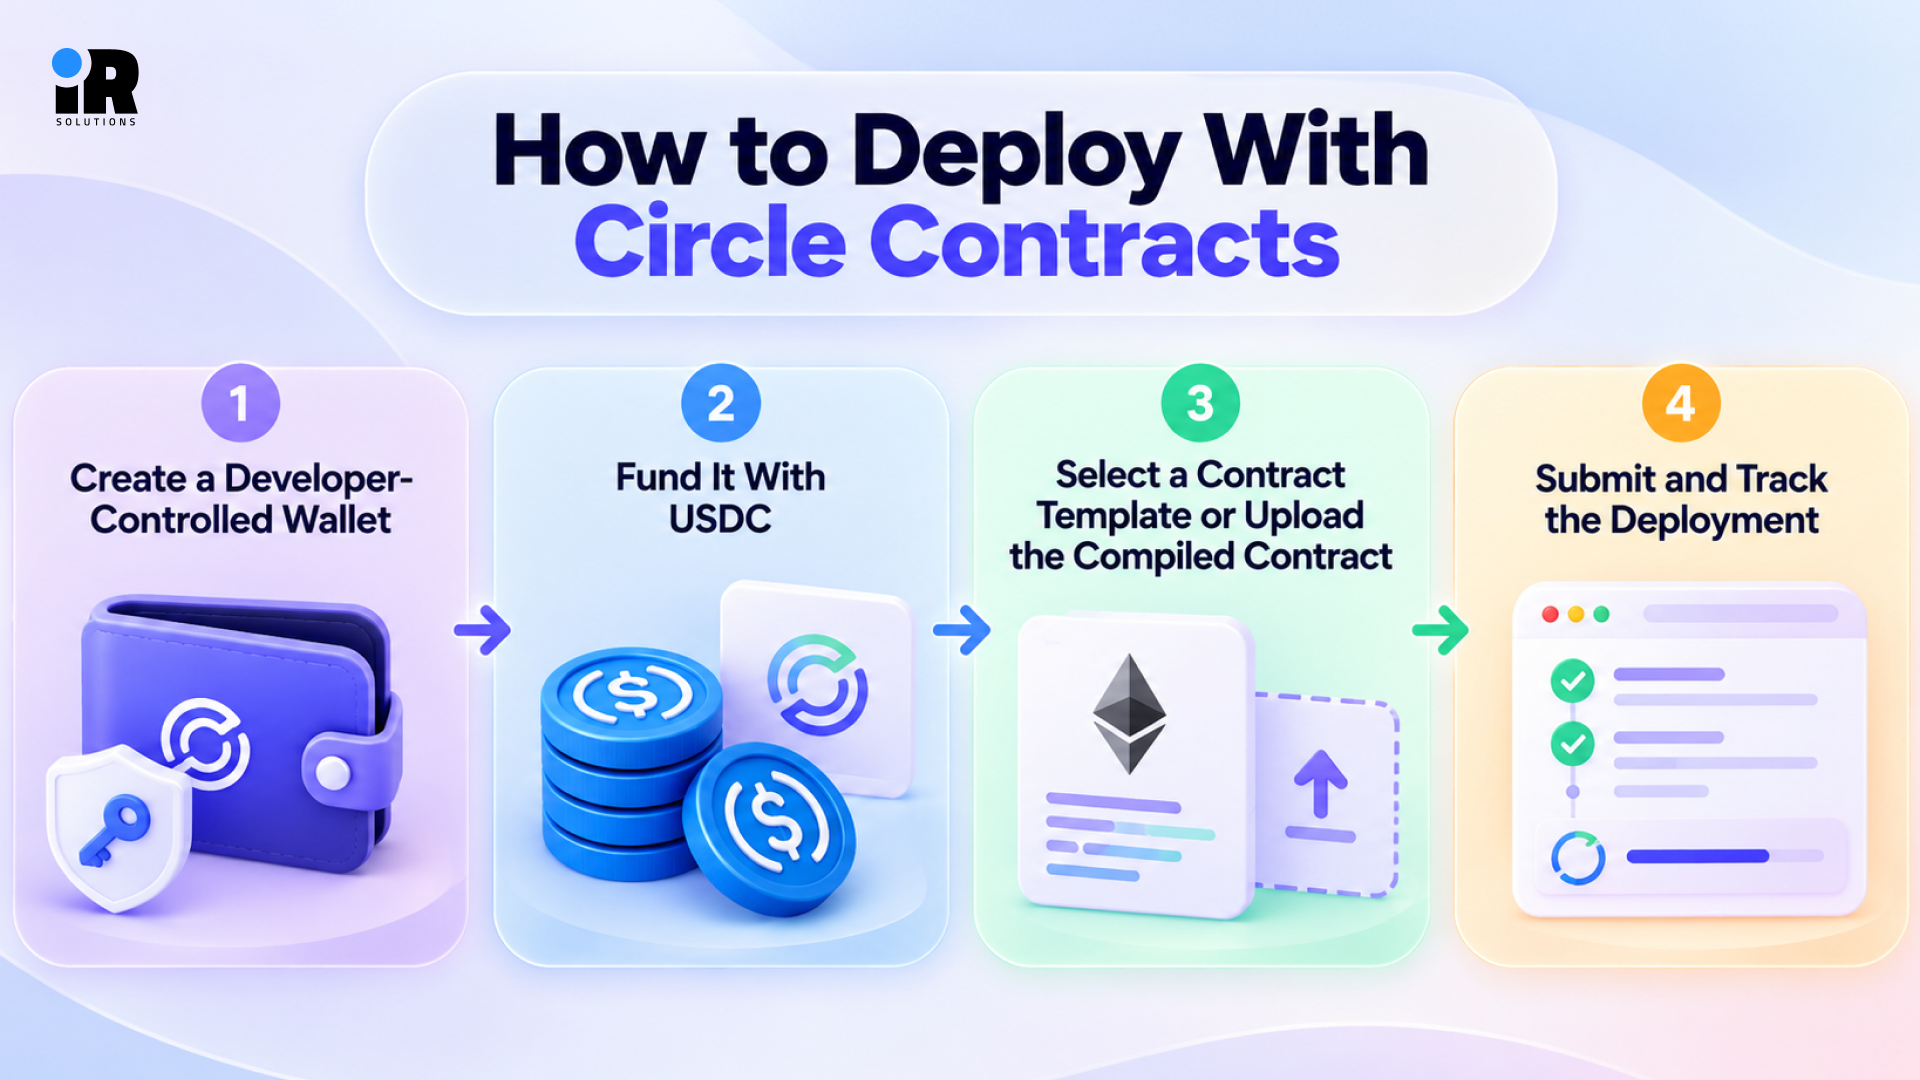
Create a Developer-Controlled Wallet
Start by creating a developer-controlled wallet through Circle's platform, which your backend manages for signing deployment transactions. Circle's official Arc ERC-20 example uses this wallet type with the Contracts SDK to deploy on Arc Testnet.
Fund It With USDC
Send testnet USDC from the faucet to the new wallet address, since Circle deployments still pay gas in USDC. Check the balance through the Circle console or API before you submit any deployment request to the network.
Select a Contract Template or Upload Compiled Contract
Select a pre-built template (ERC-20, ERC-721, or ERC-1155) or upload your own compiled contract. Templates are great for teams who want to deploy ERC-20 on Arc quickly without having to write every line of Solidity themselves.
Submit and Track the Deployment
Using the Contracts SDK, submit the deployment request and keep watching until the contract address is available. This path is best suited for backend deployments, tokenization platforms, and teams already on Circle infrastructure or managed wallet architecture.
Pre-Mainnet Deployment Checklist
Run through this checklist before any production release, because mainnet mistakes cost real USDC and user trust.
- Contract Logic: Confirm all unit tests pass, access controls work as expected, and error paths are fully tested.
- Arc Compatibility: Check native USDC assumptions, 18 and 6 decimal conversions, indexed events, and payable transfer behavior. Also confirm your code never depends on PREVRANDAO and never assumes timestamps are unique between blocks.
- Security: Arrange an external review where appropriate, protect admin keys, and review every upgrade permission carefully. Test emergency functions too, and our smart contract security and testing guide explains these practices in more detail.
- Deployment: Double-check the mainnet RPC, chain ID, funded production deployer, constructor arguments, and recorded contract addresses.
- Operations: Set up monitoring, index your events, alert on failed transactions, and watch every privileged action closely.
Moving From Arc Testnet to Mainnet
Moving to Arc mainnet deployment follows the same steps, but several settings and habits must change first.
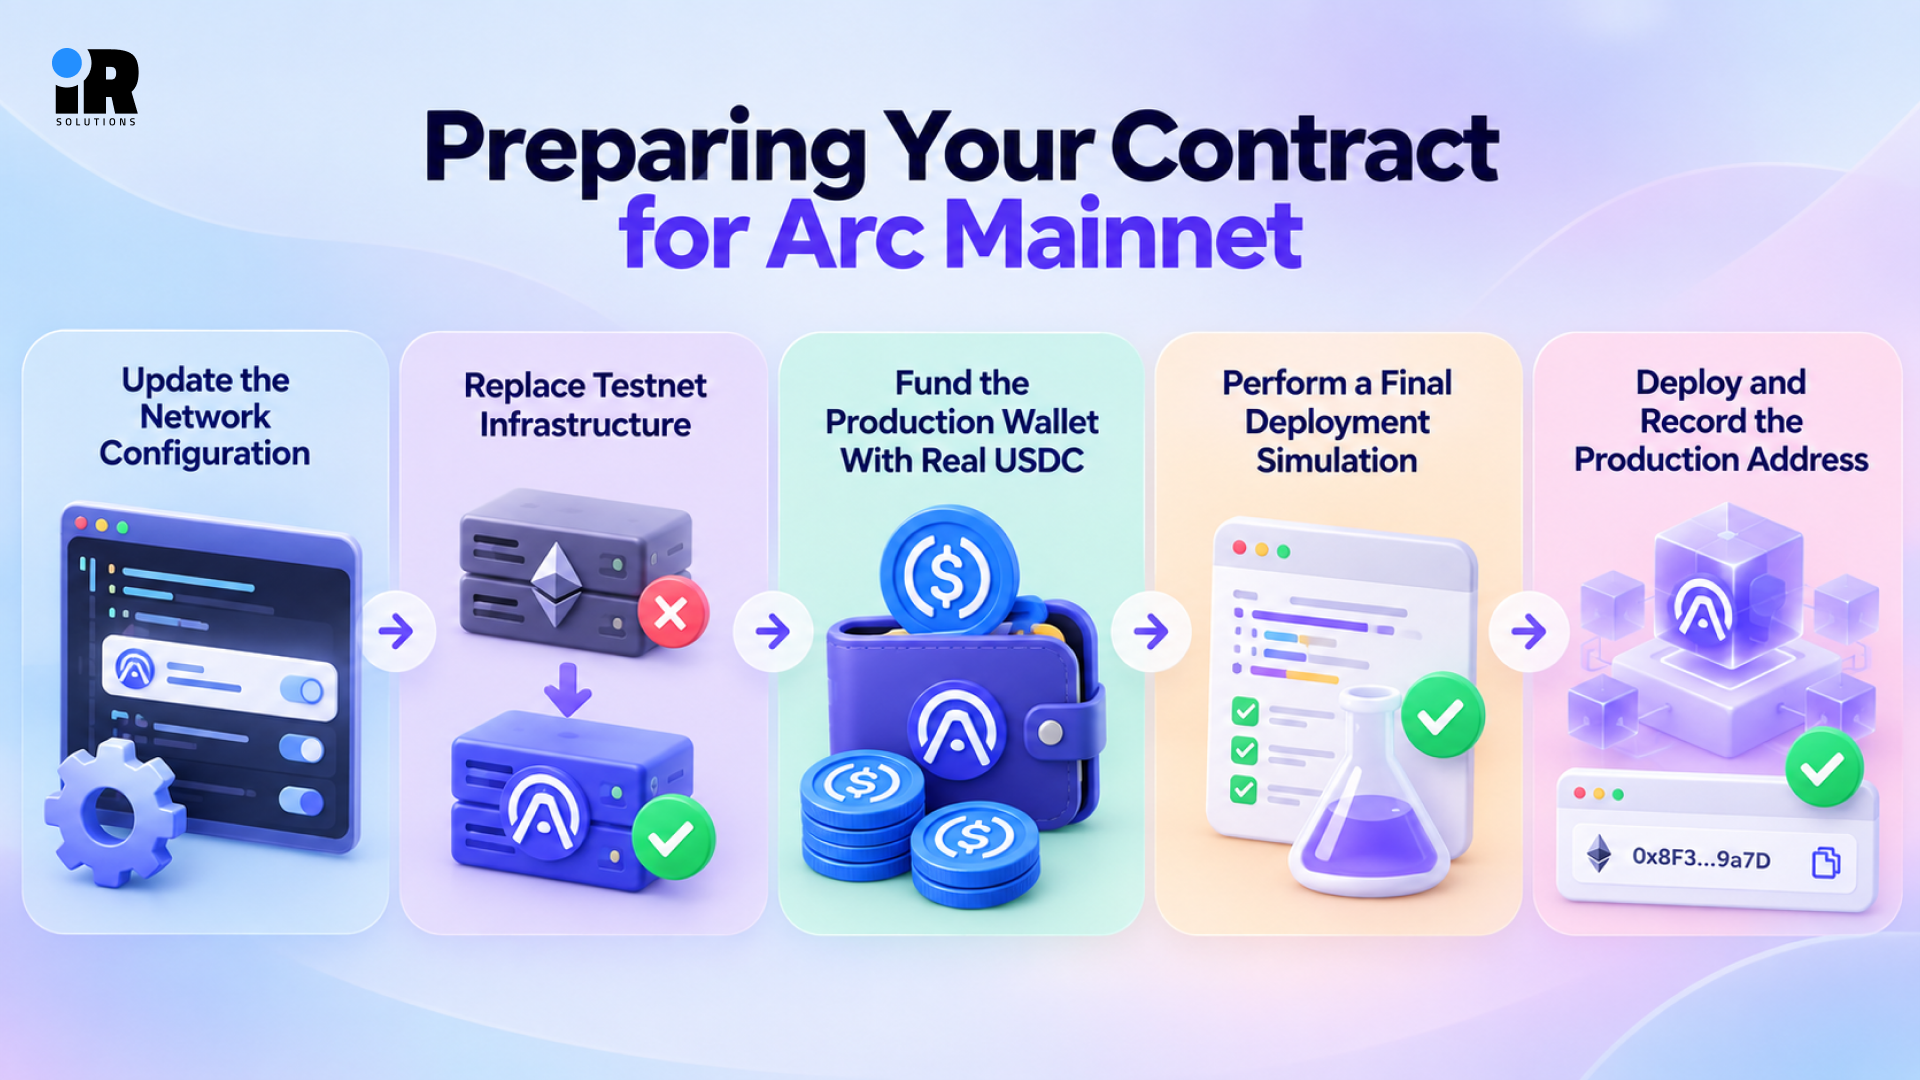
Update the Network Configuration
Arc mainnet currently uses chain ID 5042, the RPC at https://rpc.mainnet.arc.io, and the explorer at https://explorer.arc.io. Update your environment variables, deployment scripts, and Hardhat network settings so every command points to mainnet instead of testnet.
Replace Testnet Infrastructure
Review contract addresses, RPC providers, external integrations, USDC configuration, oracle addresses, Circle infrastructure, and cross-chain endpoints. Never assume testnet contract addresses match mainnet addresses, because a wrong address can silently break your entire application.
Fund the Production Wallet With Real USDC
Mainnet transactions are real USDC, so make sure to fund the production deployer with enough real balance to pay for gas when deploying. Verify the balance with arc-cast before deploying. Mistakes on mainnet cost real money, not faucet tokens for free.
Perform a Final Deployment Simulation
Simulate the transaction if applicable. Estimate gas. Check constructor input. Inspect deployer account. Check network. Before broadcasting, run the deployment script in simulation mode as per the current Arc Foundry CLI documentation. This allows you to preview the expected deployment without submitting the transaction to mainnet.
Deploy and Record the Production Address
After deploying, record the contract address, deployment transaction hash, compiler version, and the exact git commit or release. Also store the deployment configuration and every admin or multisig address, so your team always has one reliable record.
Common Arc Smart Contract Deployment Mistakes
Most failed Arc deployments come from a small group of avoidable mistakes, and each one has a simple fix.
- ETH Gas: Arc charges gas in USDC, so a wallet holding only ETH cannot pay for any deployment.
- Wrong Network: Mixing up chain IDs 5042 and 5042002 can send your contract to the wrong Arc network.
- Standard Anvil: Testing only with standard Anvil misses Arc precompiles, gas accounting, and revert behavior that Arc Foundry reproduces.
- Decimal Mixing: Treating native 18-decimal and ERC-20 6-decimal values the same will cause serious accounting errors.
- Hardcoded Keys: Your deployer wallet can be compromised instantly if a private key exists in source code or a committed .env file.
- Reused Addresses: Testnet contract addresses rarely match mainnet addresses so reusing them breaks integrations right after your launch.
- Skipped verification: Unverified contracts are viewed as suspicious by users and make debugging, integration, and security review far more difficult.
- Arc-Specific Tests Absent: Test USDC handling, timestamps, randomness assumptions, and other Arc-specific behaviour pre-mainnet.
- Extra Confirmations: Arc has deterministic finality, so waiting for Ethereum-style confirmation counts only slows down your application.
What to Do After Deployment
Deployment is not the finish line, and live contracts need ongoing care to remain safe and useful. A starting point should be source verification and a full review of roles and permissions on every privileged function.
Then set up the monitoring and event index, and update your frontend and backend with the new address. Clearly document all contract addresses and have an incident response plan available before any real user funds are received.
If you need help building, testing, or deploying smart contracts on Arc, our blockchain development services team can support the full development lifecycle.
Conclusion
The full deployment flow is simple: write, test, configure Arc, fund with USDC, and deploy on testnet first. After that, verify, interact, run pre-mainnet checks, deploy to mainnet, and keep monitoring the live contract. Arc feels familiar to EVM developers, but its USDC native model and execution rules make Arc-specific testing essential.
Arc keeps Solidity deployment familiar for EVM developers, while its USDC-native gas model and Arc-specific execution behavior require additional testing. Once the contract passes testnet validation, verify the deployment, review security controls, and record the production configuration before moving to mainnet.
Frequently Asked Questions
Can I deploy Ethereum smart contracts on Arc?
Yes, Arc is EVM compatible, so you can deploy most Ethereum smart contract platforms with the same Solidity code and familiar tools. Arc does things differently here, so you should still test USDC gas, decimal handling, timestamps, and randomness assumptions.
Does Arc support Solidity?
Yes, Arc has full support for Solidity, and developers are able to deploy Solidity contracts on Arc with standard ABI-based interaction patterns. You can write contracts as you would for Ethereum and then compile them with Arc Foundry or Hardhat.
What gas token is used to deploy contracts on Arc?
Arc uses USDC as its gas token, so every deployment and transaction fee is paid in USDC instead of ETH. On testnet, you use free faucet USDC, while mainnet deployments require real USDC held in your deployer wallet.
What is the Arc testnet RPC?
The official Arc testnet RPC is https://rpc.testnet.arc.io, and it connects your tools to the Arc Testnet network. Pair it with chain ID 5042002, and confirm the connection with arc-cast before you deploy any contract there.
What is the Arc mainnet chain ID?
The Arc mainnet chain ID is 5042, and it works with the mainnet RPC at https://rpc.mainnet.arc.io. Always confirm this value before a production deployment, since the testnet chain ID 5042002 looks very similar at a glance.
Can I use Foundry to deploy on Arc?
Yes, standard Foundry works with normal EVM deployment workflows on Arc, since the network remains fully EVM compatible. However, Arc Foundry is the better choice when you need to test Arc-specific behavior locally before deployment.
What is Arc Foundry?
Arc Foundry is a fork of Foundry with first-class Arc support, including arc-forge, arc-cast, and arc-anvil tools. It reproduces Arc precompiles, gas accounting, revert behavior, and hardfork configuration so local tests match real network behavior.
Can I use Hardhat with Arc?
Yes, Hardhat works with Arc because the network is EVM-compatible, so you only add an Arc network configuration. Include the RPC URL, chain ID, and a securely loaded account, then run your normal Hardhat deployment script.
How do I get testnet USDC for Arc?
To request free testnet USDC from Circle’s faucet, enter your deployment wallet address on the faucet page. After the request, run an arc-cast balance check to verify the funds have arrived before you start deployment.
What is the cost of deploying a smart contract on Arc?
The cost depends on the size of the contract and the conditions of the network. The deployment fee is always paid in USDC. Run a simulation and gas estimate first, and check the real fee on the explorer once the deployment is done.


