


Key Takeaways
- You can move contacts, subscriber data, and other important information from Mailchimp to Klaviyo.
- Mailchimp tags, automations, forms, and templates need to be rebuilt or imported manually.
- Cleaning and organizing your data before migration helps avoid errors and deliverability problems.
- Your segments, custom properties, forms, flows, and integrations should be tested before going live.
- Set up and warm up your sending domain before sending campaigns to your full list.
- Migration time depends on list size and setup complexity, with larger ecommerce accounts taking several weeks.
Moving from Mailchimp to Klaviyo can sound like a big job, especially when your store already has years of contacts, campaigns, and automations sitting in Mailchimp. You may know Klaviyo is a better fit for your ecommerce business, but the thought of moving everything can make you put it off.
Maybe Mailchimp no longer gives you the level of segmentation you need. Maybe your automations feel too limited, or you want a better way to connect your email marketing with Shopify. For some businesses, the monthly cost is also becoming harder to justify.
The good news is that you do not have to start from scratch. Your contacts, data, and some other information can be moved to Klaviyo. However, some parts of your setup need to be created again, and missing a step can cause problems with your emails and customer data.
A poorly planned migration can affect deliverability, break important flows, or leave parts of your old setup behind. Taking the time to plan and test the move can prevent these issues.
In this guide, we will walk through the Mailchimp to Klaviyo migration step by step, including what to move, what to rebuild, what to check, and how to switch over without disrupting your email marketing.
Why Migrate From Mailchimp to Klaviyo?
Mailchimp can work well for newsletters and straightforward email campaigns. Ecommerce brands with more complex customer journeys may need stronger segmentation, behavioral data, and automation. Klaviyo is built around these ecommerce use cases, which can make it a better fit for stores with more advanced email marketing needs.
Mailchimp works well for simple campaigns, but ecommerce brands with complex customer journeys may need stronger tools, as explained in this Klaviyo vs Mailchimp comparison.
Better Ecommerce Customer Data
Klaviyo plugs straight into your store and tracks what every customer does what they browse, what they add to cart, what they buy, what they return. All of that lands inside your email platform without any manual work.
Klaviyo can connect directly with your ecommerce store and use customer events such as product views, cart activity, purchases, and other store activity. You can then use this data to create segments and trigger automated messages based on customer behavior.
More Advanced Segmentation
Say you want to reach customers who bought from a specific category, spent over $100, and haven't come back in two months. In Klaviyo, that takes a few minutes. In Mailchimp, you're working around the platform just to get close to that. The segmentation isn't a minor upgrade it changes what you can actually do with your list.
More Powerful Email Automation
Klaviyo calls them flows. Mailchimp calls them customer journeys. They're not the same thing. Klaviyo lets you split paths based on behavior, set time delays tied to what each person did, and trigger emails based on purchase history. Mailchimp's automation is simpler, which is fine until your store grows past a point where simple stops working.
Better Integration With Ecommerce Platforms
Klaviyo has a direct Shopify integration that brings customer and order data into the platform. You can use Shopify activity such as product views, cart events, and purchases for segmentation, tracking, and automated flows.
More Personalized Customer Journeys
Because Klaviyo holds more data, you can get specific. Show someone the exact product they looked at but didn't buy. Send a win-back email timed to when that particular customer usually reorders, not a generic 30-day delay for everyone. That level of targeting isn't something you can build inside Mailchimp.
What You Need Before Migrating From Mailchimp to Klaviyo
Before migrating, make a quick list of your Mailchimp contacts, segments, forms, templates, automations, and integrations. Knowing what needs to move, what needs to be rebuilt, and what is still active will help you avoid missing data or breaking anything during the switch.
Your Mailchimp Account
You need admin access to export data, generate API keys, and pause automations at the right time. Confirm you have the correct account permissions before beginning anything.
Your Klaviyo Account
Create a Klaviyo account before you start. The free plan covers up to 250 contacts and 500 emails per month. This gives you time to set everything up and test before any billing begins.
Your Customer and Subscriber Data
Log in to Mailchimp and write down the total number of subscribed, unsubscribed, and cleaned contacts in each audience. These numbers become your verification targets after the import completes.
Your Email Templates
List every template you actively use in campaigns or automations. Decide which ones you will migrate and which ones you will rebuild from scratch inside Klaviyo's editor.
Your Segments and Tags
Document every segment and every tag inside Mailchimp. Tags do not sync automatically through the API integration you will need to export and import these manually as a separate step.
Your Automations
Go through every active automation and write down the trigger, the number of emails, the timing between each step, and any branching logic. Automations do not transfer. They must be rebuilt as Klaviyo flows using your documentation.
Your Signup Forms
List every form on your website pop-ups, footer forms, embedded forms, checkout opt-ins. Every one of these will need to be replaced with a Klaviyo form before you switch over.
Your Ecommerce and Third Party Integrations
Check which tools are connected to Mailchimp right now. Shopify, WooCommerce, Zapier, loyalty apps, and review platforms all of these need to be reconnected to Klaviyo instead.
Your Sending Domain
Log into your DNS provider and screenshot your existing SPF, DKIM, and DMARC records. Add the DNS records Klaviyo provides for your sending domain. Do not create multiple SPF records for the same domain, and review your existing authentication setup before making changes.
Mailchimp to Klaviyo Migration Checklist
A successful migration depends on more than moving your contacts. Use this checklist to keep track of the key data, settings, and marketing assets that need to be moved or set up in Klaviyo.
Migration Task | Mailchimp | Klaviyo | Status |
Contacts | ✓ | ✓ | Not Started |
Subscribers | ✓ | ✓ | Not Started |
Unsubscribes | ✓ | ✓ | Not Started |
Tags | ✓ | Custom properties | Not Started |
Segments | ✓ | ✓ | Not Started |
Email templates | ✓ | ✓ | Not Started |
Automations | ✓ | Flows | Not Started |
Signup forms | ✓ | ✓ | Not Started |
Integrations | ✓ | ✓ | Not Started |
Campaign engagement history | ✓ | 90 days | Not Started |
Tracking | ✓ | ✓ | Not Started |
Domain setup | ✓ | ✓ | Not Started |
Step 1. Audit Your Mailchimp Account
Most people skip this step because it feels slow. Then they spend three days fixing problems that a one-hour audit would have caught. Before you move anything, open your Mailchimp account and write down what's actually in there.
Review Your Audiences and Contacts
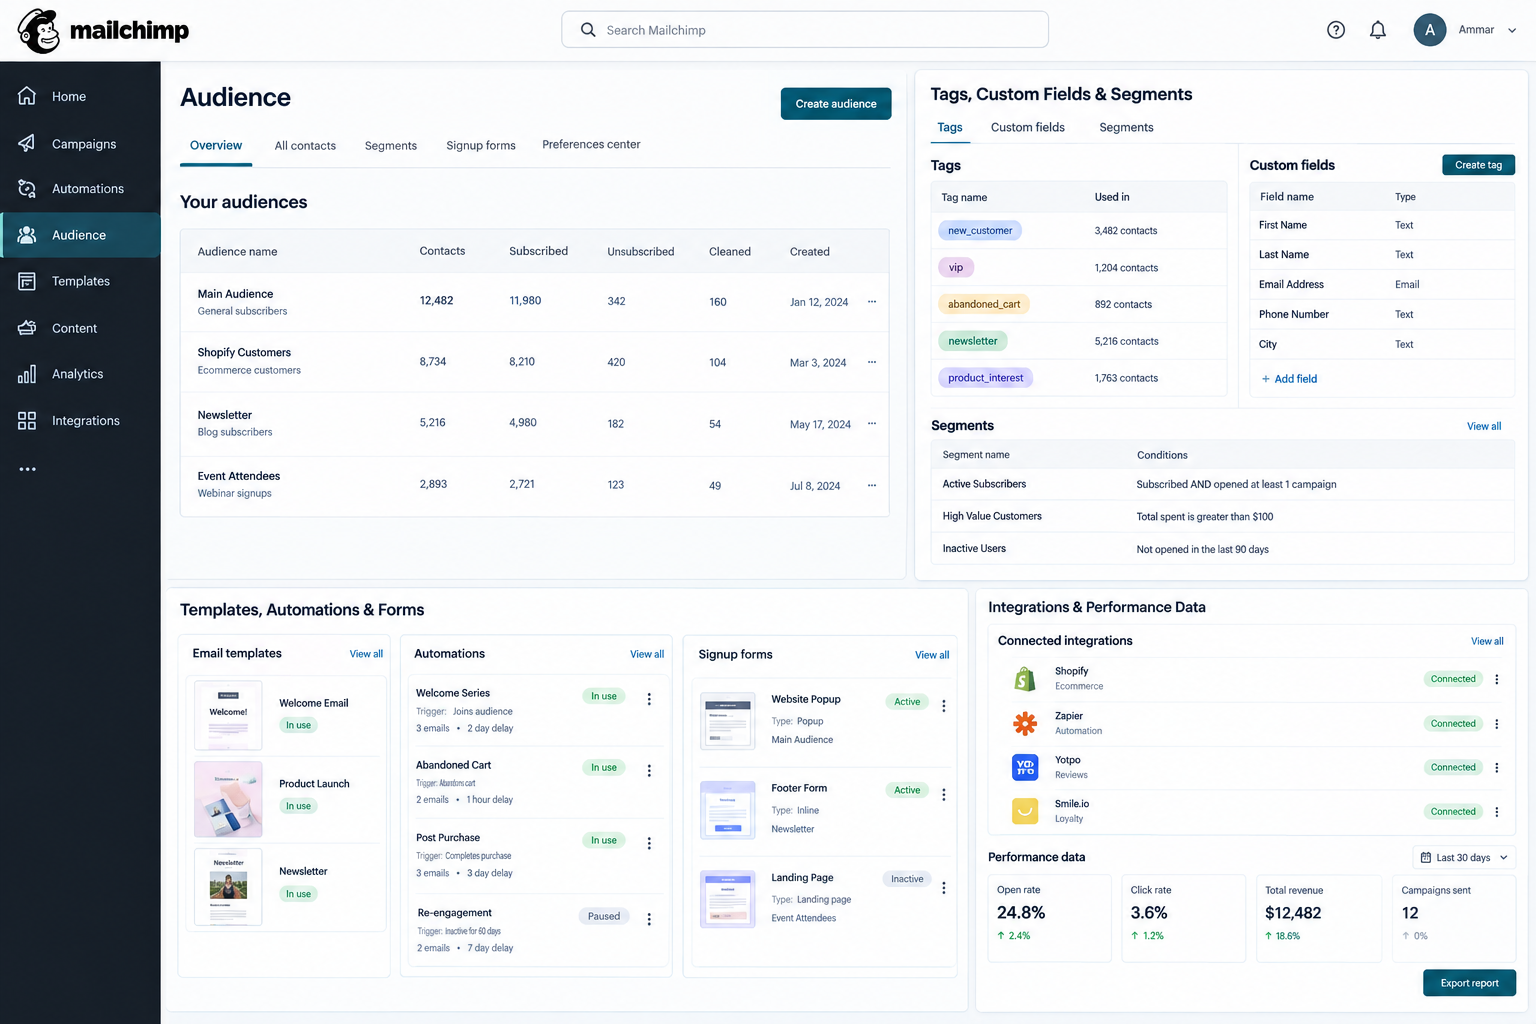
Go to your Audience tab and list every audience you have, the name, size, and what it's for. Then for each one, note the subscribed, unsubscribed, and cleaned contact counts separately. These numbers are your checkpoints. After the migration, you'll compare them against what landed in Klaviyo to confirm nothing got dropped.
Review Tags, Custom Fields, and Segments
Write down every tag, every custom merge field, and every saved segment along with the conditions used to build it. None of this transfers automatically. You'll need this list to rebuild segments in Klaviyo and to manually export tags as a separate step later.
Review Templates, Automations, and Forms
Note which email templates are actively running in campaigns or automations ignore anything unused and start fresh with those. For each automation, write down the trigger, email count, delays, and any branching logic. Take screenshots. Then find every form on your site and note where it lives and which audience it feeds. All of this gets rebuilt in Klaviyo, and this documentation is what you'll work from.
Review Integrations and Pull Your Performance Data
List every third-party tool currently connected to Mailchimp Shopify, Zapier, review apps, loyalty tools, anything. Then export your campaign open rates, click rates, and revenue data before you leave. You'll want that baseline when you start comparing results inside Klaviyo.
Step 2. Clean Your Mailchimp Data Before Migration
Moving dirty data into Klaviyo doesn't clean it up; it just gives the same mess a new home. Before you export anything, spend time getting your list in order. This is the step most guides rush through, and it's the one that causes the most problems after migration.
Remove Invalid Contacts
Go through your list and clear out duplicate email addresses, obvious invalid formats, and any hard-bounced contacts Mailchimp has marked as "cleaned." Export those cleaned contacts separately. You'll upload them straight to Klaviyo's suppression list so they never re-enter as active profiles.
Separate Engaged Subscribers
Create a segment of contacts who have not engaged with your emails recently. A 90-day period can be a useful starting point for many brands, but the right timeframe depends on your sending frequency and audience. You don't have to delete them, but don't bring them straight into your active list either. Mailing cold contacts right after a migration is one of the fastest ways to hurt your deliverability.
Check Consent and Custom Fields
Unsubscribed contacts need to come over as suppressed, not active. If you're under GDPR, document your consent timestamps before you move anything. Also check your merge fields for consistency in naming and formatting. Messy field data in Mailchimp becomes messy profile properties in Klaviyo.
Mailing cold contacts right after a migration is one of the fastest ways to hurt your deliverability, so review this Klaviyo deliverability guide before sending.
Step 3. Connect Mailchimp to Klaviyo
In Klaviyo, open Settings > Integrations and select Add Integration.
- Search for Mailchimp, then click Install.
- Enter your Mailchimp API key to connect your account.
Before connecting, check the available Advanced options:
- Collect open and click data for Mailchimp campaigns: Turn this on to bring past engagement data into Klaviyo.
- Create Klaviyo lists from Mailchimp audiences: Turn this on if you want your Mailchimp audiences recreated as Klaviyo lists.
- Only sync contacts from specific audiences: Enable this only if you want to migrate selected Mailchimp audiences instead of all of them.
Once your settings are ready, click Connect to Mailchimp
Step 4. Migrate Your Contacts to Klaviyo
Once the integration is connected, Klaviyo starts pulling in your Mailchimp contacts automatically. The sync usually completes within a few minutes for smaller lists and a bit longer for larger ones. Don't move to the next step until you've checked that everything landed correctly.
Check Your Lists and Subscriber Status
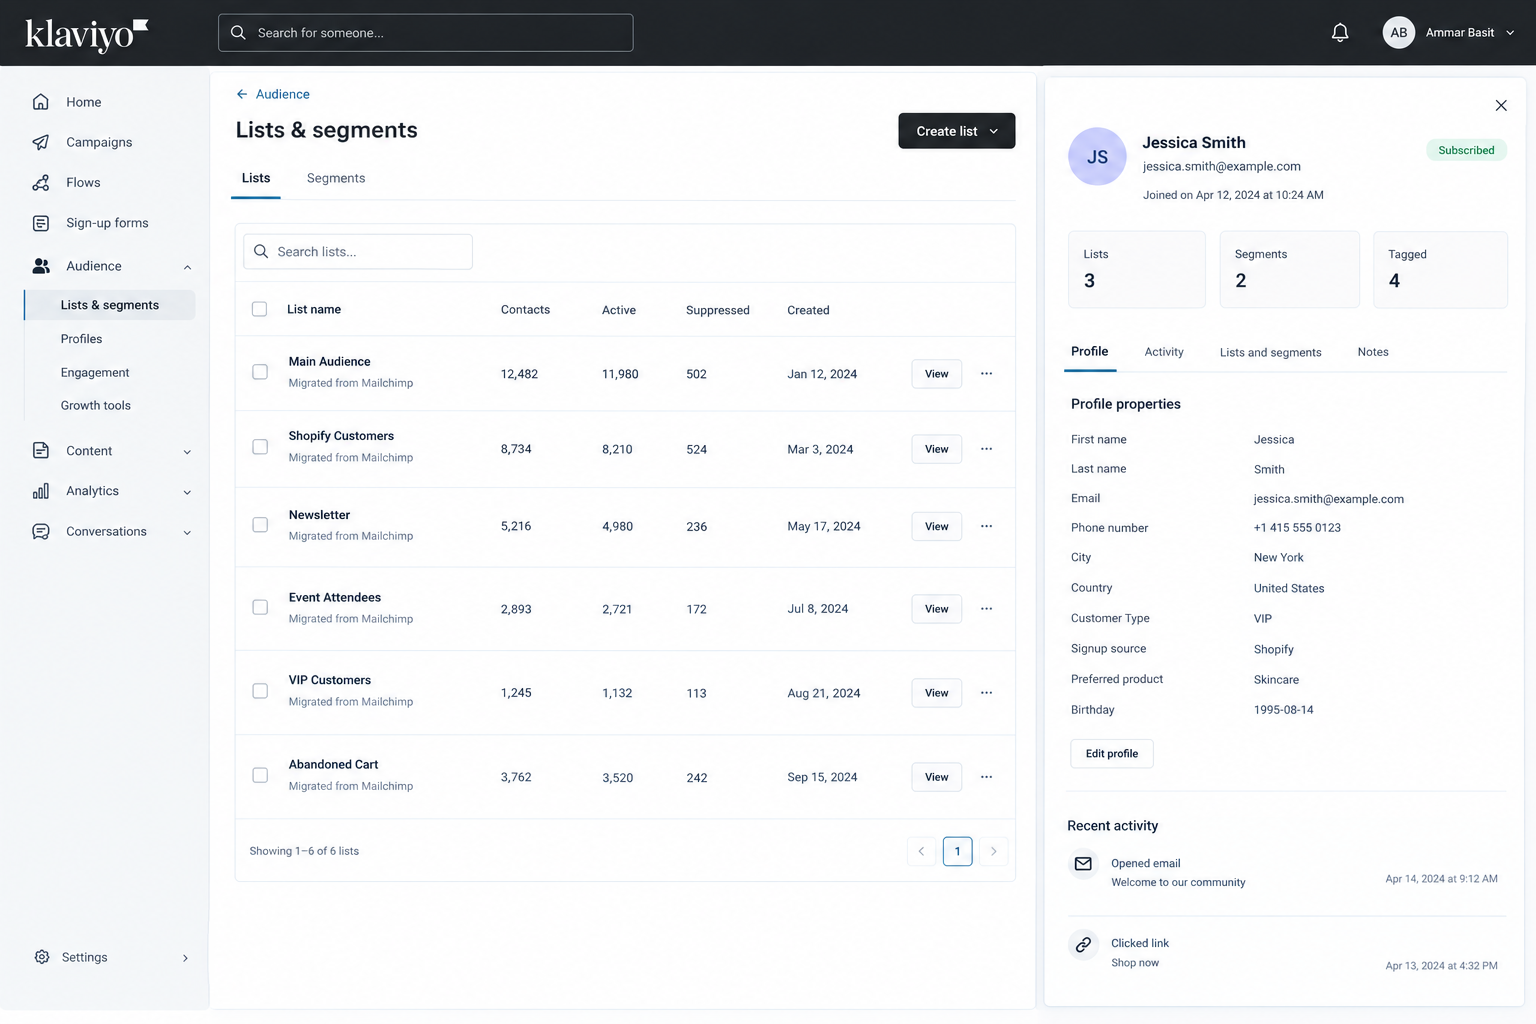
- Each Mailchimp audience comes across as a separate Klaviyo list. Check that the names and totals match your audit.
- Subscribed contacts should be active profiles; unsubscribed contacts should be suppressed. Any gap needs investigating.
- If unsubscribed contacts came over as active, export them from Mailchimp and upload them to Klaviyo's suppression list manually.
Check Bounced and Cleaned Contacts
- Mailchimp marks hard bounces as "cleaned" these belong in Klaviyo's suppression list, not your active contacts.
- Cross-check your cleaned contacts against Klaviyo's suppression list and add any that are missing before anything sends.
Verify Your Contact Counts
- Add up active and suppressed profiles in Klaviyo the total should be close to your combined Mailchimp audience count.
- A large gap usually means an audience or suppression list didn't come over. Fix it before moving on.
Spot-Check Custom Field Data
- Pull up 10 to 15 random profiles and confirm your Mailchimp merge fields came through as Klaviyo profile properties.
- Check the data inside each field, not just that the field exists empty or wrong values will break segments and emails.
Step 5. Migrate Mailchimp Tags and Custom Data
Mailchimp tags need to be moved separately because they do not transfer automatically to Klaviyo.
In Mailchimp:
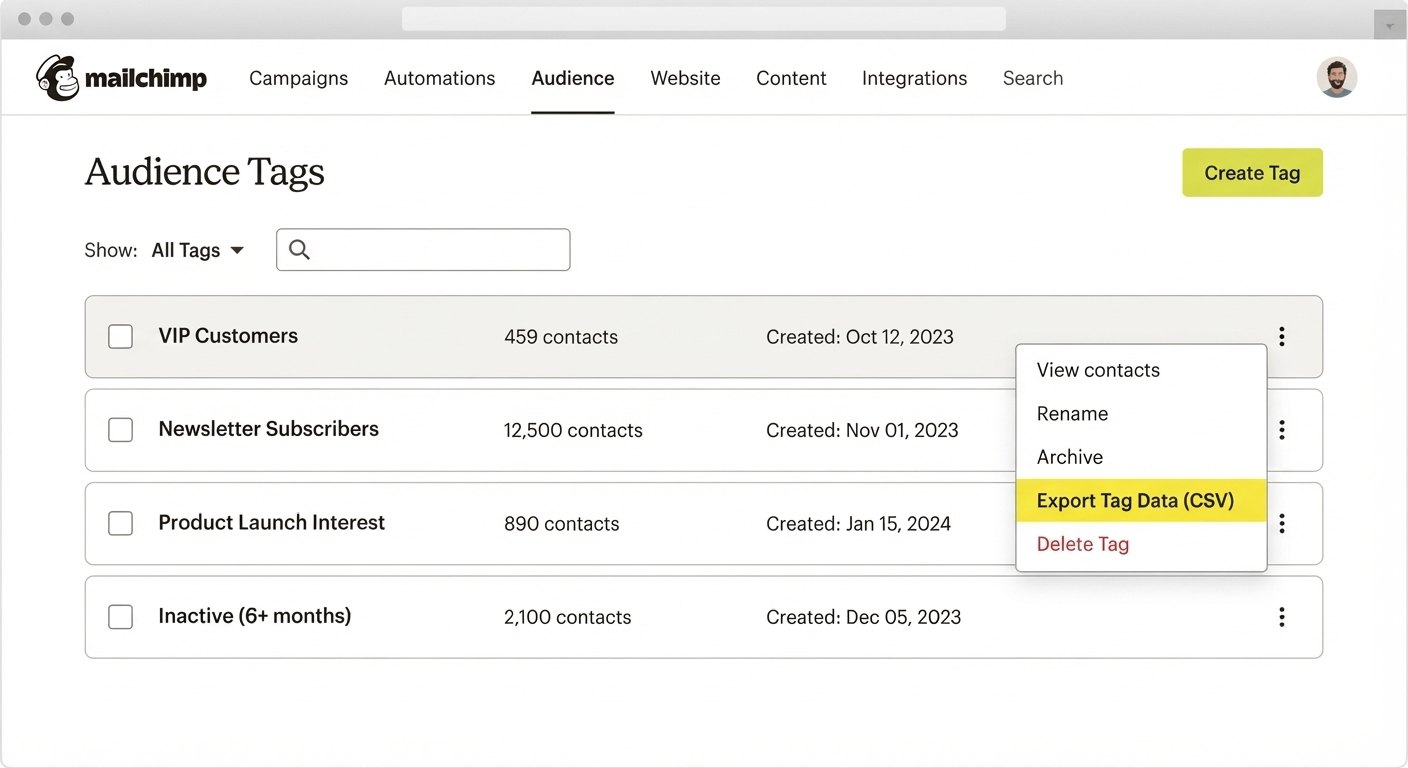
- Go to Audience → Tags.
- Review the tags you want to keep.
- Export the tag-related contact data as a CSV file.
- Remove any outdated tags or contacts.
- Keep the cleaned file ready for import.
In Klaviyo:
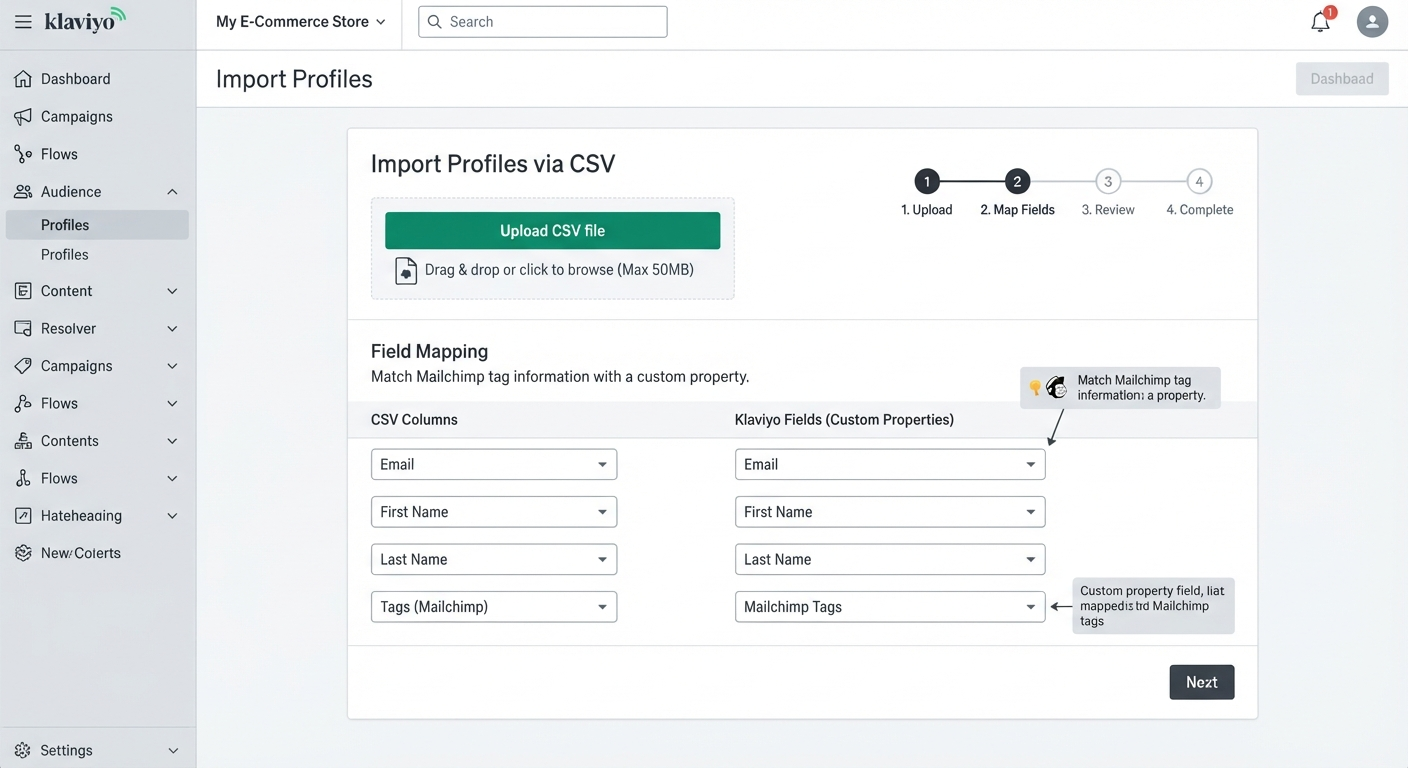
- Go to Profiles and choose Import Profiles.
- Upload your CSV file.
- Match the Mailchimp tag information with a custom property.
- Complete the import.
- Check a few profiles to confirm everything was imported correctly.
Example:
A Mailchimp VIP tag can become a Klaviyo custom property with the value VIP.
Step 6. Rebuild Your Mailchimp Segments in Klaviyo
Segment conditions do not transfer automatically, so you will need to recreate the segments you still use.
Recreate Your Important Segments
Start with the segments you identified during your migration audit. Focus on groups that are regularly used for campaigns and automations.
Most common conditions, including email activity, location, custom fields, and purchase history, can be recreated in Klaviyo. You can also use imported custom properties to rebuild groups such as VIP customers.
For ecommerce stores, recreate customer and purchase-based segments using order history, spending, and order frequency where needed.
Check Segment Membership
Pay special attention to your engaged customer segments, such as contacts who opened or clicked within the last 30, 60, or 90 days.
Before moving on, check several contacts from each important segment and compare them with the original Mailchimp groups.
Step 7. Migrate Your Mailchimp Email Templates to Klaviyo
Email templates do not transfer automatically, so focus on the templates you still use rather than moving your entire old library.
Rebuild or Import Your Templates
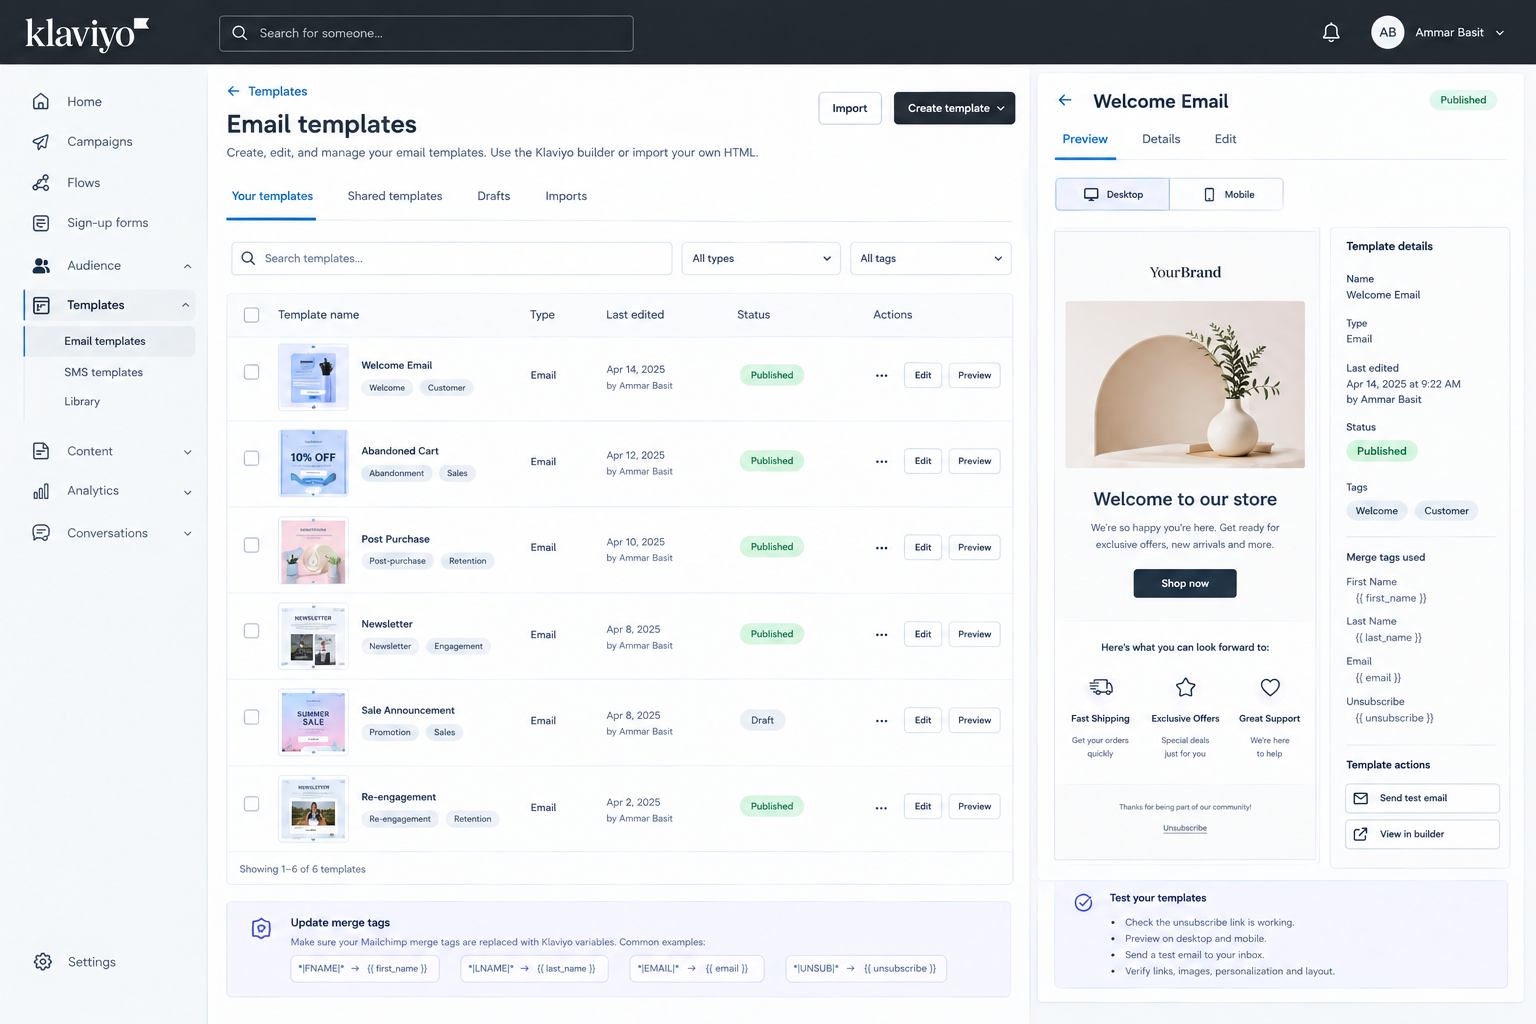
For most emails, rebuilding the design in Klaviyo's email builder is the simpler option. If you have custom HTML templates that need to stay unchanged, export the HTML from Mailchimp and import it into Klaviyo.
You will need to replace Mailchimp merge tags with Klaviyo variables. Common examples include:
- First Name → First Name
- Last Name → Last Name
- Email → Email
- Unsubscribe → Unsubscribe
Test Your Templates
Make sure every email has a working unsubscribe link. Preview each template on desktop and mobile, then send test emails to an internal inbox.
Check the links, images, personalization, spacing, and overall layout before approving the templates.
Step 8. Rebuild Mailchimp Automations as Klaviyo Flows
Automations usually take the most work because they need to be rebuilt in Klaviyo rather than simply transferred.
Map Your Automations to Klaviyo Flows
Go through the automations from your migration audit and match each one with the appropriate Klaviyo trigger, conditions, delays, and branches.
Common migrations include:
- Welcome series → Welcome flow
- Abandoned cart → Checkout Started or Added to Cart flow
- Post-purchase emails → Placed Order flow
- Win-back emails → Win-back flow
- Birthday or anniversary emails → Date-based flow
Klaviyo also gives you more options for using purchase history and customer activity. For example, a post-purchase flow can separate first-time buyers from returning customers.
Mailchimp | Klaviyo |
Automation | Flow |
Audience | List |
Segment | Segment |
Tag | Custom Property |
Merge Tag | Variable |
Customer Journey | Flow |
Test and Review Your Flows
Before activating a flow, check its trigger, conditions, branches, email timing, and content. Test the full sequence with a test contact and keep the flow turned off until everything works correctly.
Step 9. Recreate Your Mailchimp Signup Forms
Every form that currently sends subscribers to Mailchimp needs to be moved to Klaviyo before the final switch.
Rebuild and Connect Your Forms
Go through your website and identify your pop-ups, embedded forms, footer forms, landing page forms, and checkout opt-ins.
Recreate them in Klaviyo and connect each form to the correct list. If you use a third-party form or lead-generation tool, update its connection so new subscribers are sent to Klaviyo instead of Mailchimp.
Test Your Signup Forms
Submit a test email through each form and check that the contact reaches the correct Klaviyo list. Then confirm that the related welcome flow works as expected.
Step 10. Connect Your Ecommerce Store and Other Integrations
Everything that was connected to Mailchimp needs to be reviewed before the final switch.
Connect Your Store and Marketing Tools
Connect Shopify or your ecommerce platform through Klaviyo → Settings → Integrations. This allows Klaviyo to receive customer, order, product, and other store activity.
Reconnect your website tracking, CRM, lead-generation tools, analytics platforms, and other apps that send customer data to Mailchimp.
Review Your Existing Integrations
Go through your integration list and flag anything that is still connected to Mailchimp. Do not remove those connections yet. The final disconnect should happen during the switch after your testing is complete.
Step 11. Set Up and Verify Email Sending
Before sending campaigns from Klaviyo, your sending domain and email authentication need to be configured.
Configure Your Sending Domain
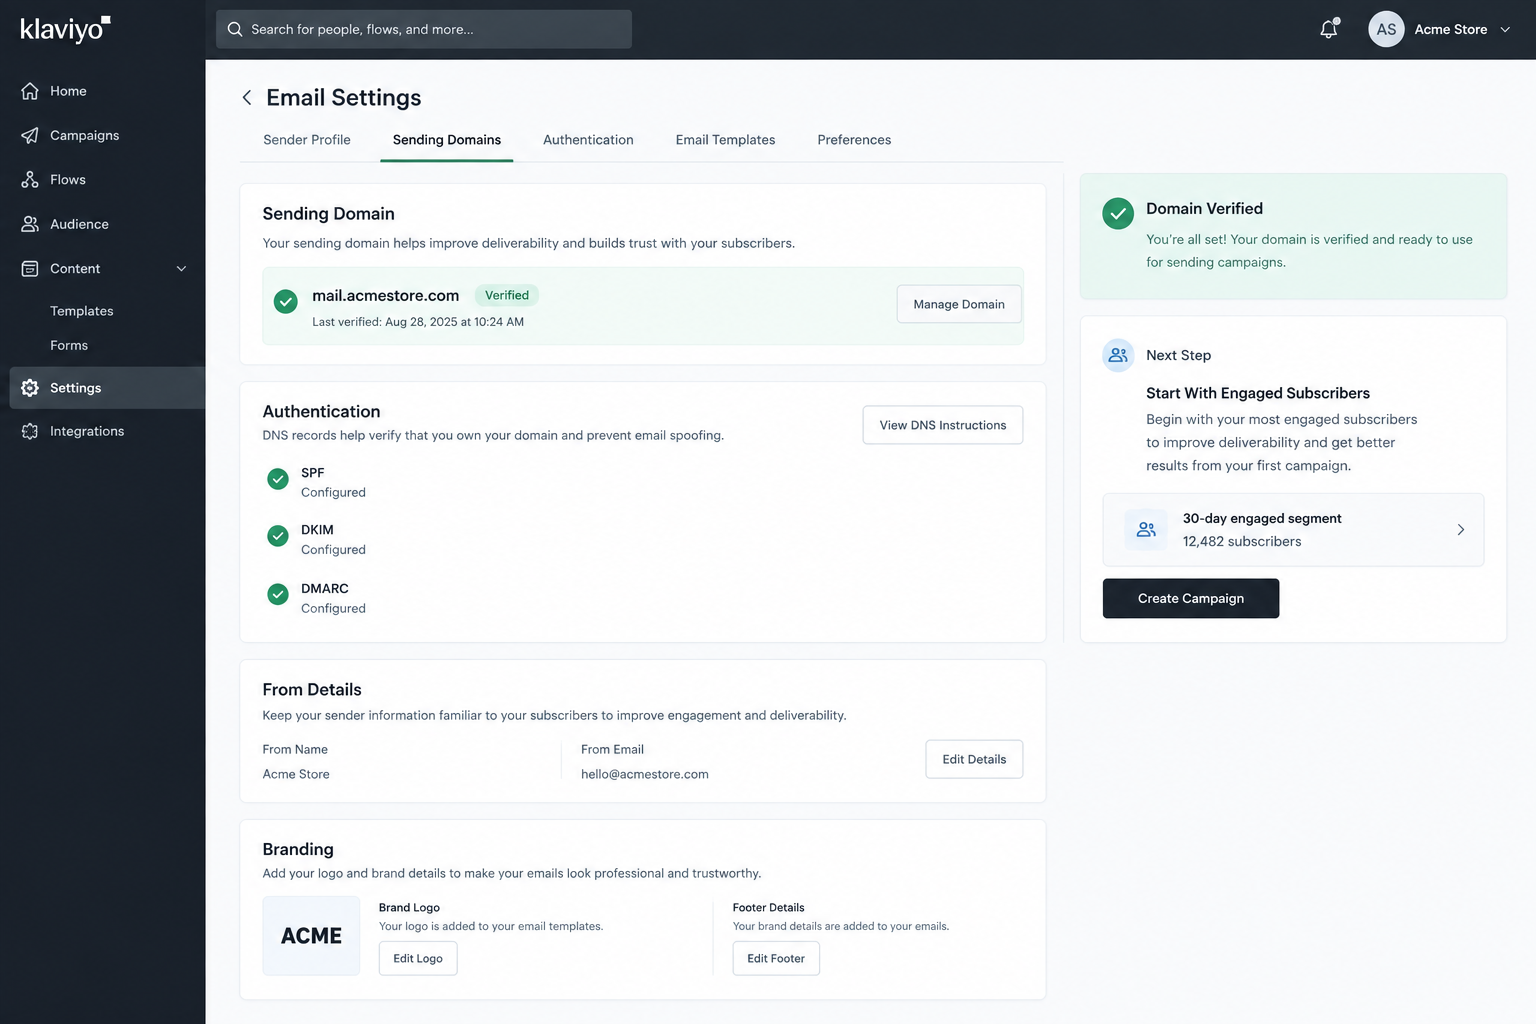
Add your sending domain in Klaviyo and follow the DNS instructions it provides. Add your sending domain in Klaviyo and follow the DNS instructions it provides. Publish the required authentication records and review your existing SPF and DMARC setup before sending. Make sure your domain is fully verified in Klaviyo before launching campaigns.
Keep your From Name and From Email familiar to existing subscribers. Add your logo, brand details, and footer information to your account and templates.
Start With Engaged Subscribers
Once your domain is verified, start with your most engaged subscribers rather than sending to the entire database.
A 30-day engaged segment is a good starting point for your first Klaviyo sends.
Step 12. Test Your Klaviyo Account Before Switching
Do a full check before making Klaviyo your main email platform.
Check Your Data, Forms, and Segments
Review contact data, subscription status, segments, and forms. Pick several contacts from different groups and compare their information with the original Mailchimp data.
Submit a test form and check that the contact enters the correct list and triggers the expected flow.
Test Your Flows and Emails
Test your main customer journeys, including the welcome flow, abandoned cart, and post-purchase flow. Make sure the correct data appears in Klaviyo and that emails contain the right customer and product information.
Also test your templates on desktop and mobile. Check links, personalization, unsubscribe options, and formatting before moving forward.
Test your key customer journeys, such as the welcome, abandoned cart, and post-purchase flows. For complex flows, you can also hire a Klaviyo expert for help with testing and review.
Step 13. Switch From Mailchimp to Klaviyo
Once testing is complete, you can make the final switch.
Pause Mailchimp and Activate Klaviyo
First, pause your active Mailchimp campaigns and automations so customers do not receive duplicate emails.
Then activate your Klaviyo flows and monitor them closely. Replace any remaining Mailchimp forms and make sure your ecommerce platform is sending data to Klaviyo.
Send Your First Klaviyo Campaign
For your first campaign, start with an engaged segment rather than your full database. Monitor engagement, bounces, and spam complaints after the send.
If performance drops noticeably, slow down your sending and review the setup before increasing the volume.
Step 14. Remove Mailchimp After a Successful Migration
Do not delete Mailchimp immediately after the switch. Give Klaviyo some time to run normally and confirm that everything is working.
Complete a Final Check
After at least a week of clean sends, compare your final contact counts, suppression data, custom properties, and ecommerce events with your original migration records.
Check that no forms or integrations are still sending data to Mailchimp and that your important Klaviyo flows are triggering correctly.
Remove Mailchimp
Once everything is confirmed, remove the remaining Mailchimp integrations.
Instead of deleting the account immediately, you can keep it on a lower-cost plan for a short period. This gives you access to older campaign data and historical metrics if you need them later.
Mailchimp to Klaviyo Migration Mapping
Mailchimp and Klaviyo use different names for some of the same features. Use this table to match your Mailchimp data and tools with their closest Klaviyo equivalents during migration.
Mailchimp | Klaviyo |
Audience | List |
Segment | Segment |
Tag | Custom Property |
Automation | Flow |
Merge Tag | Variable |
Signup Form | Signup Form |
Campaign | Campaign |
Subscriber | Profile |
Unsubscribed Contact | Suppressed Profile |
Mailchimp to Klaviyo Migration Best Practices
These are the things that matter most when you are in the middle of a migration. Follow them, and you will avoid 90% of the common problems.
Clean Your Data Before Importing
Do not carry bad data into a new platform. Remove invalid contacts, upload bounces to the suppression list, and cut anyone who has not engaged in over a year. A smaller, clean list delivers better results.
Keep Your Main Subscriber List Simple
Do not try to recreate every Mailchimp audience as a separate Klaviyo list. One main list with segments and properties handles everything more cleanly.
Preserve Consent Data
Never re-email someone who was unsubscribed in Mailchimp. Your suppression list must be complete in Klaviyo before the first send goes out.
Migrate Only What You Actually Need
Not every template, segment, or automation from Mailchimp needs to come over. If you were not actively using something before, leave it behind and start clean.
Rebuild Important Flows Before Sending Campaigns
Get your welcome series, abandoned cart, and post-purchase flows live and tested before sending your first campaign. Flows run continuously and generate revenue every day. Campaigns are occasional.
Test Everything Before Going Live
This is repeated here because it is the step most often skipped. A broken unsubscribe link or a flow with wrong timing causes real problems with real customers. Test with real inputs before activating anything.
Monitor Deliverability After Migration
Watch open rates, bounce rates, and spam complaint rates closely for the first four weeks in Klaviyo. Deliverability issues caught early are much easier to fix than ones left to compound.
Keep a Backup of Your Mailchimp Data
Export your full contact list, your campaign history, and your performance metrics before closing your Mailchimp account. Store everything somewhere accessible for at least six months.
How Long Does a Mailchimp to Klaviyo Migration Take?
Small Email List —Under 5,000 contacts, one or two automations, no custom integrations. Expect 1–2 weeks including domain warm-up.
Medium Ecommerce Business — 5,000 to 50,000 contacts, five to ten active automations, Shopify connected. Expect 3–4 weeks including domain warm-up.
Large Ecommerce Business — Over 50,000 contacts, complex segmentation, multiple flows with branching logic, and several third-party integrations. Expect 5–8 weeks depending on the scope.
Domain warm-up is the part you cannot rush. It happens on a calendar timeline regardless of how fast the technical setup goes, and typically takes two to four weeks.
How Much Does It Cost to Migrate From Mailchimp to Klaviyo?
The cost depends on your list size and how much needs to be rebuilt. A basic migration can be handled yourself, while larger projects with flows, templates, integrations, and data cleanup usually cost more.
Migration Type | Estimated Cost | Usually Includes |
DIY migration | $0 + Klaviyo plan | Contacts, lists, segments, and basic setup |
Basic migration | $500–$2,000 | Contact migration, data mapping, and basic testing |
Standard migration | $2,000–$5,000 | Contacts, templates, segments, forms, and flows |
Complex migration | $5,000–$10,000+ | Large lists, multiple flows, integrations, custom templates, and testing |
Full-service agency migration | $10,000–$20,000+ | Complete rebuild, advanced flows, integrations, deliverability setup, and post-migration support |
These are general market estimates, not fixed Klaviyo fees. The final cost depends on the number of contacts, flows, templates, integrations, and the amount of work needed to prepare and test the account.
If you are still deciding whether Klaviyo makes financial sense for your business, see our guide on whether Klaviyo is worth the cost.
Conclusion
Switching from Mailchimp to Klaviyo is not something you can rush through in a few spare hours. It takes real time, a clear order of steps, and at least one round of "wait, why isn't this working?" before things click into place.
But once it's done, the difference shows up fast. You stop guessing which customers to email and start sending to people based on what they actually did in your store. The abandoned cart flow runs automatically. The win-back sequence goes out to the right people at the right time. You're no longer working around your email platform to do what you wanted to do from the start.
The contacts carry over. The subscription data carries over. The 90 days of engagement history carries over. What doesn't carry over is your old setup, but that's not really a loss. Most of those automations and templates needed a fresh look anyway.
Take the migration one step at a time, check the numbers after each stage, and warm up your domain before you go anywhere near your full list. Do that, and the switch from Mailchimp to Klaviyo stops feeling like a project and starts feeling like the thing you should have done six months ago.
Frequently Asked Questions
Can I migrate from Mailchimp to Klaviyo without losing contacts?
Yes. Klaviyo's native Mailchimp integration syncs all contacts including subscription status and 90 days of engagement history. Unsubscribed and bounced contacts are handled automatically during the sync.
Can I transfer Mailchimp subscribers to Klaviyo?
Yes. Subscribers transfer through the API integration and appear as active profiles in Klaviyo. You can also export them as a CSV from Mailchimp and import them manually if you prefer more control over the process.
Do Mailchimp tags transfer to Klaviyo?
Tags do not sync automatically. You need to export each tag group as a CSV from Mailchimp and import it into Klaviyo as a custom profile property. This is covered in detail in Step 5 of this guide.
Can I migrate Mailchimp automations to Klaviyo?
Automations do not transfer. They must be rebuilt as Klaviyo flows manually. Klaviyo has a pre-built flow library with templates for every common ecommerce automation, which speeds up the rebuild considerably.
Can I move Mailchimp email templates to Klaviyo?
You can export templates as HTML from Mailchimp and import them into Klaviyo after replacing Mailchimp merge tags with Klaviyo variables. Most brands find that rebuilding in Klaviyo's editor produces better results than importing old code.
Will my Mailchimp unsubscribes transfer to Klaviyo?
Yes, through the API integration. Unsubscribed contacts arrive in Klaviyo as suppressed profiles and will not receive future emails. Verify the suppression counts after import to confirm everything transferred correctly.
Can I migrate Mailchimp historical email data to Klaviyo?
Klaviyo imports 90 days of campaign engagement history through the integration. Older campaign data does not transfer. Export and save historical metrics from Mailchimp before you close the account.
Should I keep Mailchimp after moving to Klaviyo?
Keep your Mailchimp account available for a short period after the migration if you still need access to older campaigns, reports, or data. Once you have confirmed that the information you need has been preserved, you can decide whether to downgrade or close the account.
How long does Mailchimp to Klaviyo migration take?
Typically 2–6 weeks depending on list size and the complexity of your automations and integrations. Most of the calendar time is spent on domain warm-up, which cannot be compressed.
Is Mailchimp to Klaviyo migration difficult?
It is not technically complex, but it does require careful planning and a clear order of operations. The biggest risks are skipping domain warm-up and not suppressing unsubscribed contacts correctly. Follow this guide in order, and both risks are addressed.